User Guide
Tutorials on adding a Scoreboard to OBS (other programs are similar)
- Getting Started
- How to add a timer/counter in OBS
- How to add a Scorebug Background
- How to correctly display Tenths
Getting Started
Scoreboard for OBS on macOS is a user-friendly app designed for sports enthusiasts, broadcasters, and streamers who want to display live score updates in their OBS Studio scenes for two teams/players. This lightweight application simplifies the process of managing and integrating a scoreboard, allowing you to focus on the game and your audience.
Enhance your sports broadcasts with Scoreboard for OBS on macOS — simple, effective, and designed for live streaming!
Ideal Use Cases
- Sports events (football, basketball, volleyball, etc.)
- eSports and gaming tournaments
- Live commentary and analysis streams
Features
- Live Score Updates: Easily update scores in real-time during a game or match.
- Text File Integration: Automatically generates and updates a
.txtfile with the scoreboard information, making it compatible with OBS Studio’s Text (FreeType 2) source. - Minimal Resource Usage: The app is optimized for macOS, ensuring smooth performance even on resource-constrained systems.
- Intuitive Interface: Simple and clean interface for managing teams, scores, and other match details.
- Customizable Layout: Tailor the scoreboard’s appearance to match your stream’s style, including font size, color, and positioning. This can be done in a streamer program, for example in OBS.
How It Works
- Set Up the App
- Install the app on your macOS device Mac App Store.
- Open the app and configure your teams/players names, and other initial settings.
- Update Scores in Real-Time
- Adjust team scores using the app’s user-friendly controls.
- The app automatically saves the updated scores to a
.txtfiles. Default directoryDownloads - ScoreBoard Outputs
- Integrate with OBS Studio
- In OBS, create a new Text (FreeType 2) source or drag and drop the desired text file into OBS.
- Enable the “Read from File” option and select the
.txtfile generated by the app. - Customize the created text source in OBS: position, size, font, color, etc.
- Stream or Record
- As you update scores in the Scoreboard app, the changes are reflected in OBS in real-time. OBS will automatically read the files from the disk (approximately once per second) and display the result.
How to add a text timer or counter in OBS
1. Open OBS Studio
Launch OBS Studio on your computer.
2. Create a New Scene (Optional)
If you want to organize your setup, create a new scene:
- Click the + button in the Scenes section.
- Give your scene a name and save it.
3. Add a Text Source
- In the Sources section, click the + button.
- Select Text (FreeType 2) from the list.
Or simply drag the desired text file from Finder into the OBS window.
4. Name Your Text Source
- Enter a descriptive name for the source (e.g.,
Main Timer). - Click OK to create the source.
5. Enable Reading from File
- In the text source properties window, check the box labeled Read from File.
- This will allow the text to be dynamically updated from a TXT file.
6. Select Your TXT File
- Click the Browse button next to the file path field.
- Navigate to your local TXT file, select it, and click Open.
7. Place the Text on the Canvas
- Drag the text box in the preview area to position it on your scene.
- Resize it as necessary.
8. Customize Appearance
- Use the Font, Size, and Color options to adjust the text style.
- Experiment with alignment, gradient, and background settings to fit your layout.
9. Test File Updates
- Change the value of the counter in ScoreBoard, for example, start a timer.
- Verify that the changes appear in OBS in real-time.
Similarly, add and configure all the timers/counters needed for the sport scoreboard stream.
How to add a Scorebug background image in OBS

1. Add a Image source
- In the Sources section, click the + button.
- Select Image from the list.
Or simply drag the desired image file from Finder into the OBS window.
2. Name your Image source
- Enter a descriptive name for the source (e.g.,
Background) and press OK button.
3. Select your Image file
- Click the Browse button next to the file path field.
- Navigate to your local img file, select it, and click Open.
- Then click OK to save the source.
4. Place the Image on the Canvas below the text layers
- Drag the image box in the preview area to position it on your scene.
- Resize it as necessary.
- In the list of sources, move the background to the very bottom.
Example of background for scoreboard:

How to display tenths of a second in OBS
OBS by default reads text files approximately once per second. To display tenths correctly, you need to reduce this delay
1. Install the plugin Advanced Scene Switcher
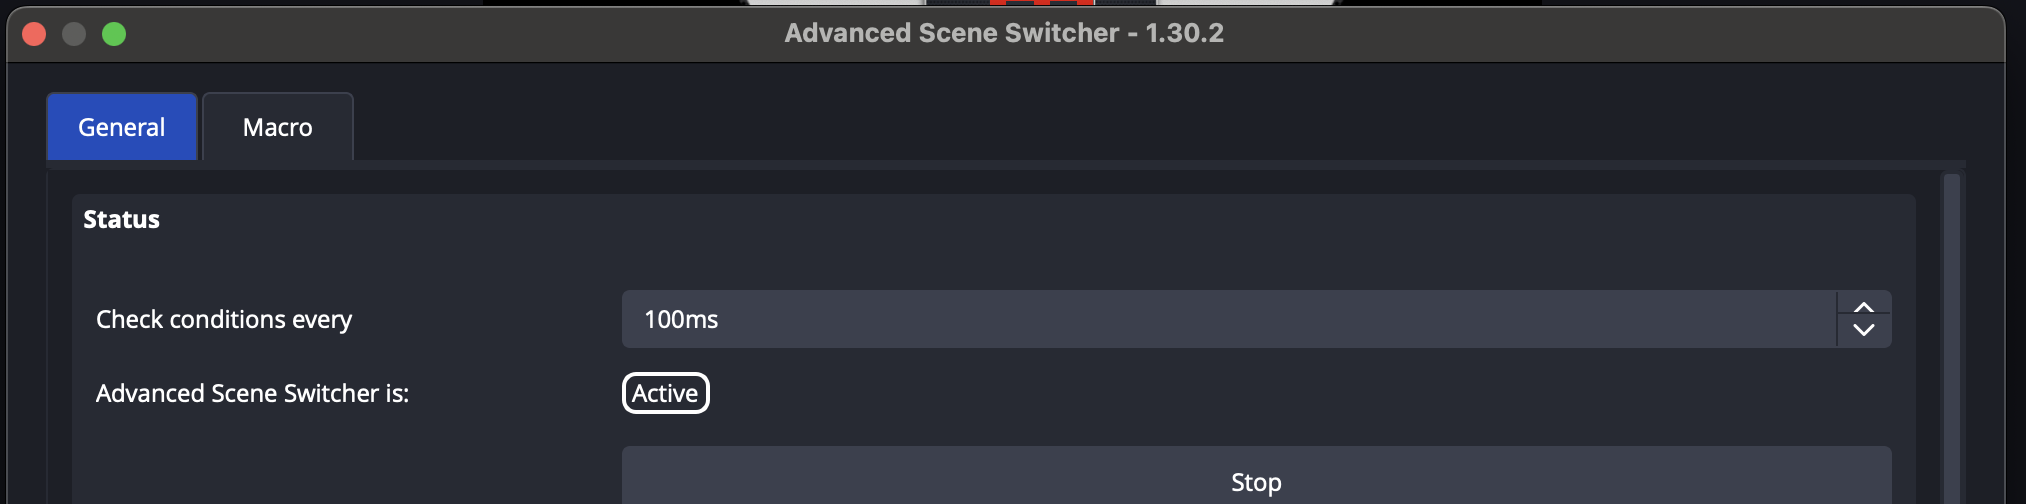
2. Open the plugin
- Main menu in OBS - Tools - Advanced Scene Switcher
- In the General tab set Check conditions every to 100ms
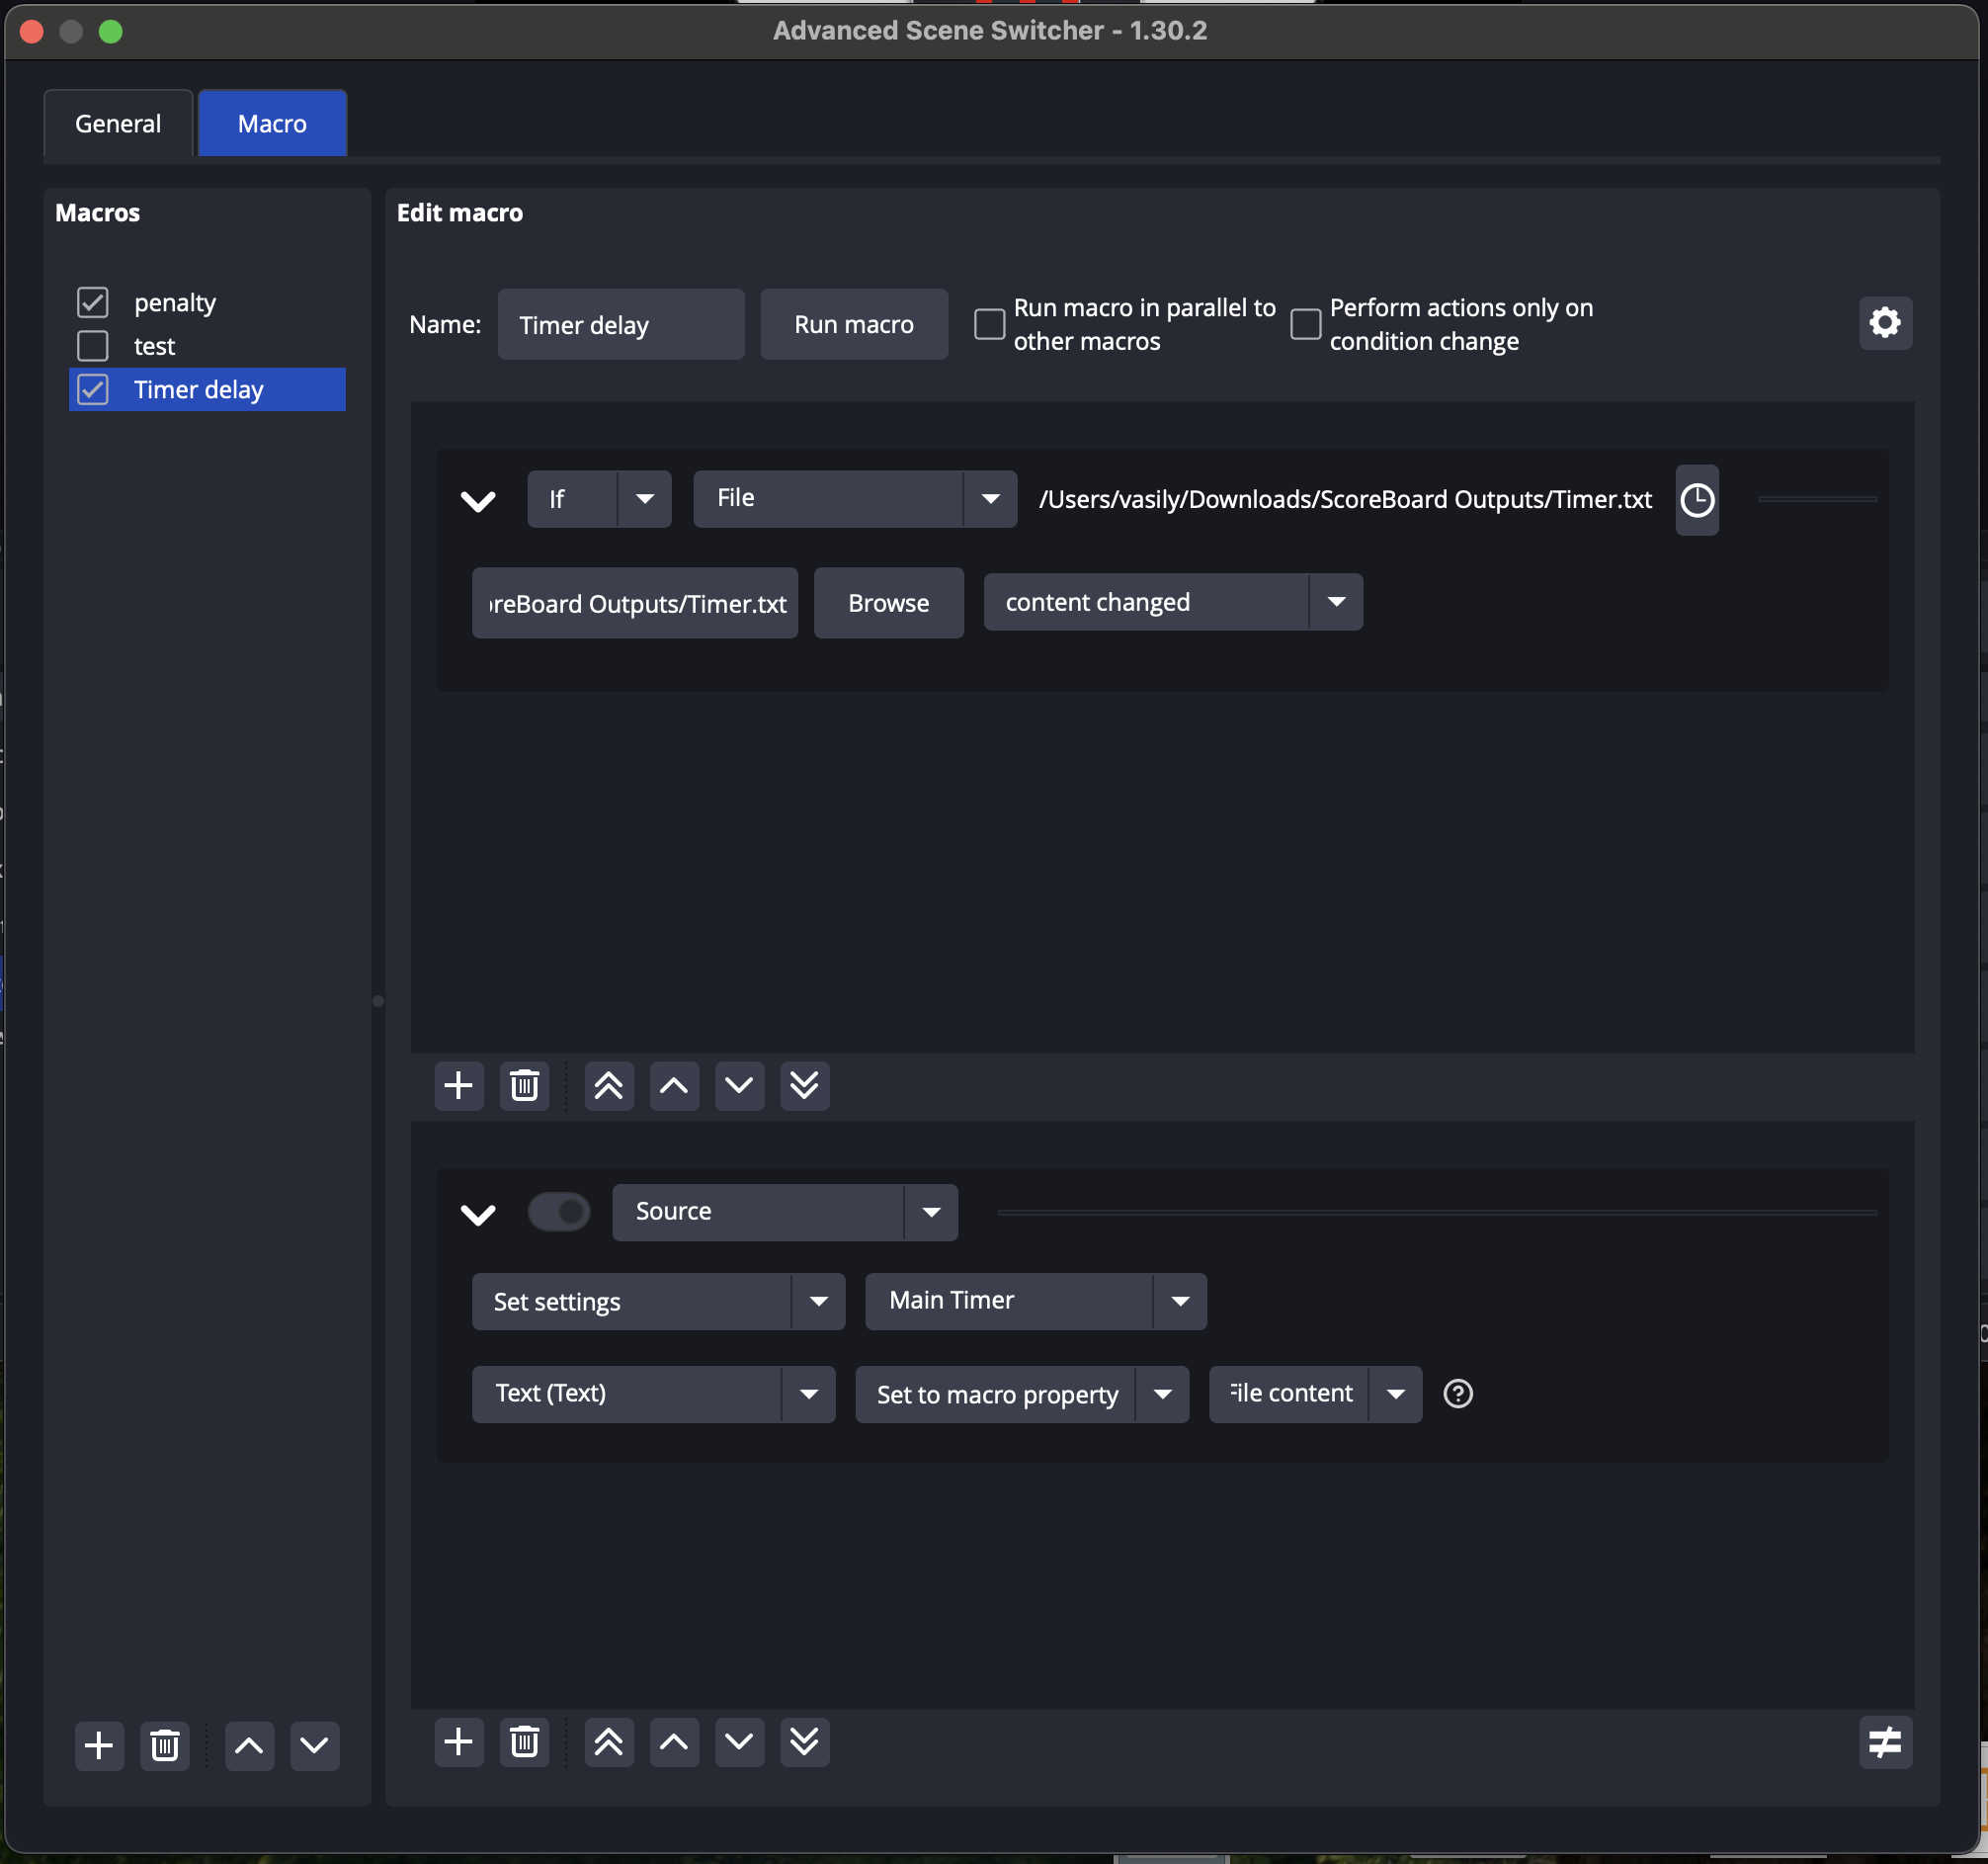
3. Add a new Macro
- Click the + button in the bottom-left corner and rename the macro (e.g., “Timer Delay”)
- Uncheck Perform actions only on condition change
4. Add a new condition
- Click the + button in the conditions section
- Select If
- Choose File
- Click Browse
- Select the file “Timer.txt” (or another file) from the output directory of the ScoreBoard app
- Set the condition to content changed
5. Add a new action
- Click the + button in the actions section
- Select Source
- Choose Set Settings
- Select your FreeType 2 source (e.g., “Main Timer”)
- Set Text(Text)
- Choose Set to macro property
- Select File content
6. Change the text input mode for your timer source
- In OBS, double-click your FreeType 2 source in the Sources list (e.g., “Main Timer”)
- Change Text input mode to Manual
- Enter any placeholder text (e.g., a space) in the Text field
- Click OK

7. Run the main timer in the ScoreBoard app and test
- In ScoreBoard settings, choose a style for the main timer (e.g., [:5.3] or [5.3])
- For testing, set the timer in ScoreBoard to 1 minute (1:00)
- Start the timer and check the result in OBS